Why You’ll Love This Recipe
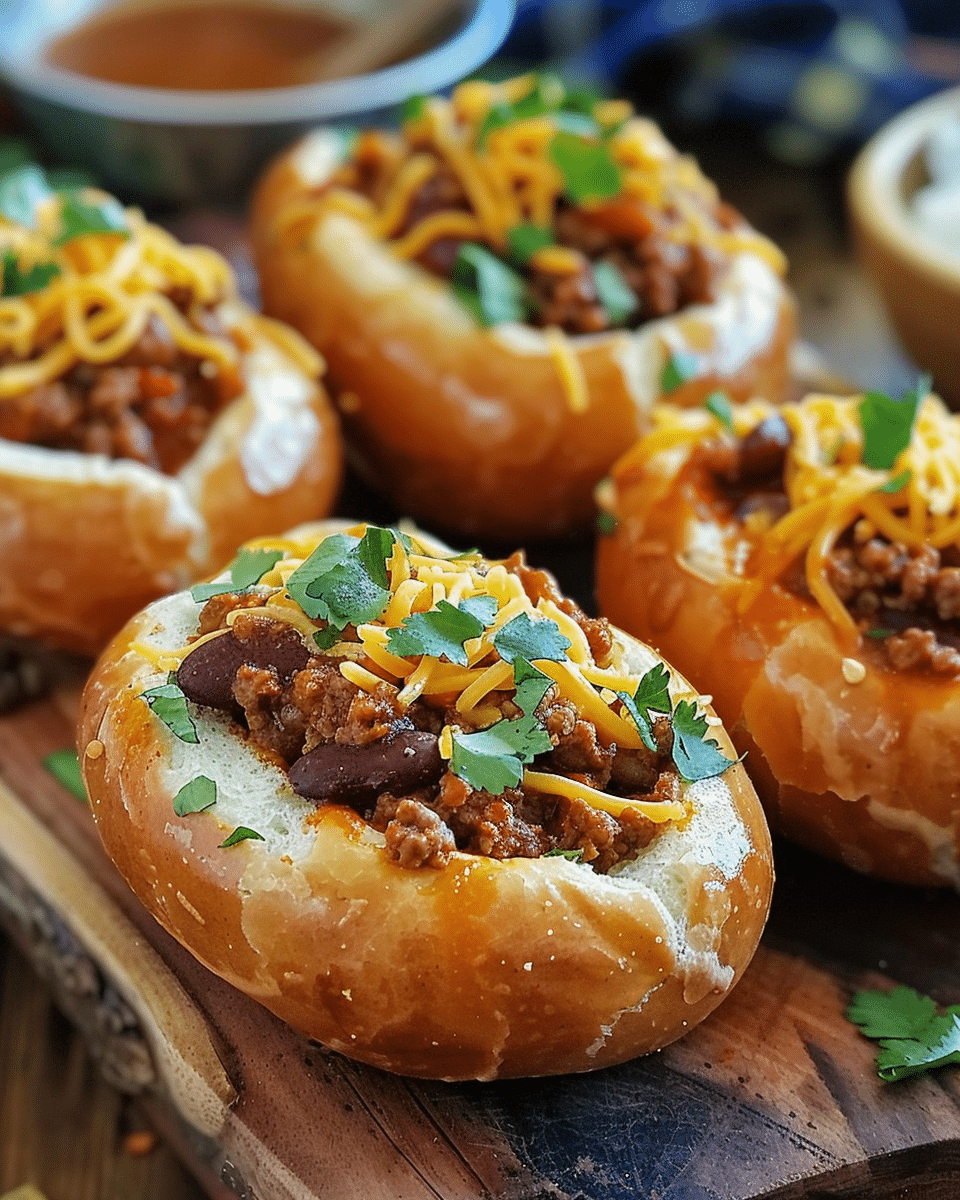
These Mini Chili Football Bread Bowls offer a creative twist on the classic chili dish by using football-shaped bread bowls to serve the chili in a fun and festive way. The bread is soft and fluffy, with just the right amount of crunch on the outside, and it perfectly complements the hearty, spiced chili. These mini bread bowls are perfect for portion control, easy to serve, and make for a fun presentation. Whether you’re serving them for a Super Bowl party, a family dinner, or as a fun meal for kids, these chili bowls are sure to delight.
Ingredients
For the chili:
-
1 lb ground beef (or turkey for a leaner option)
-
1 small onion, diced
-
2 cloves garlic, minced
-
1 can (15 oz) kidney beans, drained and rinsed
-
1 can (15 oz) diced tomatoes
-
1 can (6 oz) tomato paste
-
1 cup beef broth (or vegetable broth)
-
1 tbsp chili powder
-
1 tsp cumin
-
1/2 tsp smoked paprika
-
1/2 tsp cayenne pepper (optional, for heat)
-
Salt and pepper to taste
For the mini bread bowls:
-
6-8 mini round bread rolls (or small individual loaves)
-
Olive oil, for brushing
For garnish:
-
Shredded cheese (cheddar, Monterey Jack, or a blend)
-
Chopped green onions
-
Sour cream (optional)
-
Jalapeño slices (optional)
(Tip: You’ll find the full list of ingredients and measurements in the recipe card below.)
Directions
For the chili:
-
Cook the ground meat: In a large pot or Dutch oven, heat a tablespoon of olive oil over medium heat. Add the ground beef and cook until browned, breaking it up with a spoon as it cooks. Once the beef is browned, drain any excess fat.
-
Sauté the vegetables: Add the diced onion to the pot and cook for 3-4 minutes, or until softened. Add the minced garlic and cook for an additional 30 seconds until fragrant.
-
Add the chili ingredients: Stir in the kidney beans, diced tomatoes, tomato paste, beef broth, chili powder, cumin, paprika, cayenne pepper (if using), salt, and pepper. Bring the mixture to a simmer, then reduce the heat to low and let it cook for 20-30 minutes, stirring occasionally, until the chili has thickened and the flavors have melded together. Adjust the seasoning to taste.
For the mini bread bowls:
-
Prepare the bread bowls: Preheat your oven to 375°F (190°C). Using a small knife, cut the top off of each mini bread roll and scoop out the soft insides to create a hollow space for the chili. Be careful not to tear the bread, leaving a sturdy shell.
-
Brush with olive oil: Brush the inside and outside of each bread bowl with a little olive oil to help it crisp up in the oven.
-
Bake the bread bowls: Place the hollowed-out bread bowls on a baking sheet and bake for 5-7 minutes, or until the bread is slightly toasted and crispy on the outside.
Assembling the mini chili football bread bowls:
-
Fill the bread bowls: Once the chili has thickened and the bread bowls are ready, carefully spoon the chili into each mini bread bowl until it’s filled to the top.
-
Garnish: Top each chili-filled bread bowl with shredded cheese, chopped green onions, sour cream, and jalapeño slices, if desired.
-
Serve: Serve the mini chili football bread bowls immediately and enjoy!
Servings and Timing
-
Servings: 6-8 mini bread bowls (depending on the size of the bread rolls)
-
Prep Time: 15-20 minutes
-
Cook Time: 30-35 minutes (for chili and baking the bread)
-
Total Time: 45-55 minutes
Variations
-
Vegetarian Version: For a vegetarian version, substitute the ground beef with plant-based crumbles, lentils, or beans, and use vegetable broth.
-
Spicy Chili: Add more cayenne pepper or diced jalapeños to the chili to make it spicier. You can also top with hot sauce or chili flakes for extra heat.
-
Cheesy Chili: For a cheesy twist, stir some shredded cheese into the chili as it simmers, or top with a layer of melted cheese before serving.
-
Use Store-Bought Chili: If you’re short on time, you can use store-bought chili and simply heat it up before filling the bread bowls.
Storage/Reheating
-
Storage: Store leftover chili in an airtight container in the refrigerator for up to 3-4 days. You can also store any extra bread bowls (unfilled) in a zip-top bag for up to 2 days.
-
Reheating: Reheat the chili on the stove over medium heat, stirring occasionally. If reheating the bread bowls, place them in a 300°F (150°C) oven for 5-10 minutes to warm them through.
-
Freezing: You can freeze the chili (without the bread bowls) for up to 2-3 months. Thaw it overnight in the fridge and reheat it before serving. Freezing the bread bowls is not recommended, as they may become soggy when thawed.
FAQs
1. Can I make the chili ahead of time?
Yes! The chili can be made ahead of time and stored in the refrigerator for 2-3 days or frozen for up to 2-3 months. Reheat it on the stove before serving.
2. Can I use larger bread bowls?
Absolutely! You can use larger round bread loaves for a bigger serving. Just make sure to adjust the amount of chili accordingly and increase the baking time for the bread bowls.
3. Can I make the bread bowls from scratch?
Yes, you can make homemade bread for this recipe, but store-bought mini bread rolls or loaves are a quicker and more convenient option for this dish.
4. Can I use a different type of bread?
Yes! If you prefer a different bread type, you can use French bread, ciabatta rolls, or any other type of hearty bread. Just make sure it has enough structure to hold the chili.
5. How do I prevent the bread bowls from getting soggy?
To prevent the bread from becoming too soggy, be sure to bake the bread bowls until they’re lightly crispy. Also, avoid overfilling them with chili and serve them soon after filling.
6. How can I make the chili more flavorful?
If you want a deeper flavor, you can add a tablespoon of tomato paste or a splash of Worcestershire sauce. You can also add a pinch of smoked paprika for a smoky undertone.
7. Can I add toppings to the chili?
Yes! You can top your chili with sour cream, shredded cheese, sliced jalapeños, diced avocado, or fresh cilantro for extra flavor.
8. Can I use ground turkey instead of beef?
Yes, ground turkey or chicken can be used instead of ground beef for a leaner option.
9. How do I serve this for a crowd?
You can easily scale up this recipe by using larger bread bowls or individual bowls. Simply increase the amount of chili and bread accordingly.
10. Can I use canned chili for this recipe?
Yes, canned chili can be used as a quick option. Just heat it up and fill the bread bowls for a fast and easy meal.
Conclusion
Mini Chili Football Bread Bowls are a fun, creative, and tasty way to enjoy chili. With their hearty, flavorful chili and soft, warm bread bowls, they’re perfect for serving at parties, tailgates, or as a cozy family dinner. The combination of flavors and textures is irresistible, and they’re sure to be a hit with anyone who loves a hearty, satisfying meal. Enjoy these mini chili bread bowls as a perfect way to enjoy chili in a fun and flavorful way!

Mini Chili Football Bread Bowls
- Prep Time: 15-20 minutes
- Cook Time: 30-35 minutes
- Total Time: 45-55 minutes
- Yield: 6-8 servings
- Category: Main Course
- Method: Baking, Stovetop
- Cuisine: Mexican-American
Description
Mini Chili Football Bread Bowls are a fun and flavorful way to enjoy hearty chili served in individual football-shaped bread bowls. With a rich and savory homemade chili, soft bread, and delicious toppings, these mini bread bowls are perfect for parties, tailgates, or cozy dinners.
Ingredients
- For the chili:
-
- 1 lb ground beef (or turkey for a leaner option)
- 1 small onion, diced
- 2 cloves garlic, minced
- 1 can (15 oz) kidney beans, drained and rinsed
- 1 can (15 oz) diced tomatoes
- 1 can (6 oz) tomato paste
- 1 cup beef broth (or vegetable broth)
- 1 tbsp chili powder
- 1 tsp cumin
- 1/2 tsp smoked paprika
- 1/2 tsp cayenne pepper (optional, for heat)
- Salt and pepper to taste
- For the mini bread bowls:
- 6–8 mini round bread rolls (or small individual loaves)
- Olive oil, for brushing
- For garnish:
- Shredded cheese (cheddar, Monterey Jack, or a blend)
- Chopped green onions
- Sour cream (optional)
- Jalapeño slices (optional)
Instructions
- For the chili: In a large pot, cook ground beef over medium heat until browned, breaking it up as it cooks. Drain excess fat.
- Add diced onion and cook for 3-4 minutes. Add garlic and cook for another 30 seconds until fragrant.
- Stir in kidney beans, diced tomatoes, tomato paste, beef broth, chili powder, cumin, paprika, cayenne pepper (if using), salt, and pepper. Bring to a simmer and cook on low for 20-30 minutes, stirring occasionally. Adjust seasoning to taste.
- For the mini bread bowls: Preheat oven to 375°F (190°C). Cut off the tops of mini bread rolls and scoop out the soft inside to create a hollow space. Brush with olive oil and bake for 5-7 minutes until crispy.
- Assembling: Fill each bread bowl with the prepared chili. Top with shredded cheese, green onions, sour cream, and jalapeño slices if desired.
- Serve immediately and enjoy!
Notes
For a vegetarian version, substitute ground beef with plant-based crumbles or lentils and use vegetable broth.If you prefer a spicier chili, add more cayenne pepper or diced jalapeños.If you’re short on time, you can use store-bought chili and simply heat it up in the bread bowls.Make sure to toast the bread bowls until they’re slightly crispy to avoid sogginess when filled with chili.
Nutrition
- Serving Size: 1 bread bowl
- Calories: 450
- Sugar: 6g
- Sodium: 800mg
- Fat: 18g
- Saturated Fat: 6g
- Unsaturated Fat: 10g
- Trans Fat: 0g
- Carbohydrates: 50g
- Fiber: 7g
- Protein: 28g
- Cholesterol: 65mg

